This post is a bit late as we've had the kitchen finished for a while, but its given me a chance to try out some of the features of the design so I can tell you how they worked out. The only thing left to do is paint a small section of ceiling, so please ignore the blue masking tape!
We had an cabinet maker design our kitchen after the wood floors were done. I had already done a very rough design using the Ikea online kitchen design tool. This confirmed to me that we would NOT be using Ikea as it did not fit well in the odd space of our kitchen! But at least I was able to show that to the cabinet maker to get us started. He measured everything and asked me way too many questions, and then went and drew it out in his software. So
unlike the bathroom, where I had full control of the design, I was not able to check everything as I only had the limited time when we I met with the cabinet maker to look at the design in detail. Fortunately the kitchen turned out great, but I would have probably made changes in the laundry if I'd had a better look at it. Too late now and nothing too terrible. (I'll post about the laundry another day)
 |
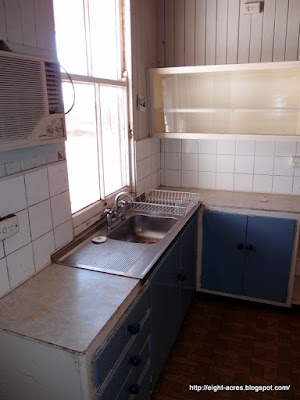
| A before photo for reference |
 |
| Add caption |
The kitchen turned into an odd shape because we took out the old pantry (which was built into the old woodstove alcove) and filled in the little window, so that it was part of the main room. The other issue was access to the roof space, through a hole in the middle of the kitchen ceiling, which we could have moved, but it is good there as its in the highest part of the roof, so we couldn't put an island bench right under that hole. The previous kitchen had benches around the outside and a table in the middle, which meant walking across the room to use different spaces, not a good use of the room in my opinion.
Our design requirements included:
- Gas cooktop and electric oven built in (I hate how food falls down the side of the free-standing oven at Nanango)
- Some overhead cupboards with glass for displaying nice things (we went with a frosted glass so you can see colour but I don't have to keep it tidy)
- Light colours and reflective/shiny surfaces as the room is quite dark with only two windows, one facing west and the other north onto a veranda.
- Plenty of storage space so that benches could be kept clear, at the same time bench-space for slow cooker/fermentation etc so that its not in the way of meal preparations
- Somewhere to eat most of the time as there is no obvious place for a dining room table anywhere else in the house
- Double sink with draining boards on both sides
- Dishdrawer - we didn't think there was a need for a full dishwasher with only two people and we are pretty conservative with dishes after so many years of hand-washing
- Water filter for the drinking water
- Deep drawers for easy storage
- Rubbish bins in a drawer/cabinet so it can be hidden away
After much rearranging and sticking masking tape on the floor and pulling it up again, we came up with the final idea. The oven and cooktop are in the old pantry space, and bench and overhead cupboards continue around to the pantry, fridge and storage for bulky appliances. Then in an C-shape on the opposite wall we have the sink and a "breakfast bar" with stools.
 |
| the stove in the old pantry which was the original stove space |
 |
| overhead cabinets with glass and lots of drawers! |
 |
new fridge (the old one was 15 years old and had been modified several times)
with pantry to the right and appliances to the left |
 |
| the breakfast bar |
 |
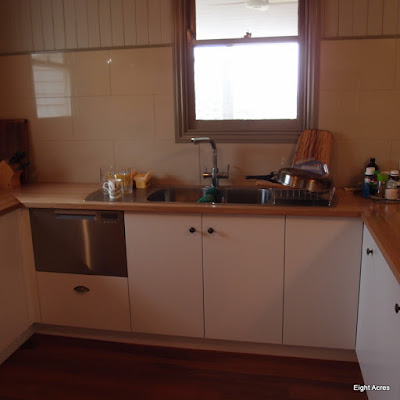
| large double sinks with double draining boards and the dishdrawer |
 |
| the breakfast bar again |
 |
| and another view of the kitchen |
We went with a wooden benchtop made from panels of Tasmanian Oak. It is still a laminated product (the panels are stuck together to make a full benchtop), so we had to have it finished in varnish, which we didn't really want, but it does need to be sealed properly and we didn't have time or energy to find suitable slabs of wood to use instead. They had to be cut on a 45deg angle at the corners, which then dictated where the sink would fit. The cupboard doors are MDF painted in matt Dulux "limed white quarter", which is just a few shades lighter than the walls (Dulux "tapestry beige"), although it looks nearly white. I was nervous using white, as I didn't want to be cleaning fingerprints all the time, but a dark cupboard would have made the room too dark.
We have ended up with so much storage I actually have a few cupboards empty at the moment! We haven't quite cleaned out the old kitchen, so I may find something to put in there soon, still working out where everything goes anyway. I love having everything tucked away, and no clutter, the deep drawers are wonderful for finding everything easily, and Pete even knows where everything is already (he was still claiming that he didn't know where to put things after seven years in the old kitchen, but it was really just not wanting to brave the over-full cupboards).
The dishdrawer has been amazing! We are so used to handwashing, its a lovely change to just pop everything in the dishdrawer (still handwashing pots and pans etc). We don't even really need to run it once a day, except for a lack of cutlery (need to bring the rest over). I am trialing some eco-dishwasher powder from Biome, but will also try making my own later.
We got an undersink filter than is integrated with the tap, so we only needed one tap. The filter includes a UV lamp, which means it removes solids and then treats any bacteria/viruses etc. Even though we have been drinking rainwater with just filters, its nice to know that the water is definitely clean! I went for a high tap and deep sinks so virtually all of my big pots fit easily into the sink.
You may notice that there is no microwave. We do own one, its probably 10 years old or more and lately we haven't been using it for much. Actually I only use it to heat wheat packs. I reheat food in pots on the cooktop, I defrost meat in a sink of hotwater (if not organised enough to get it out early), I don't know what else I would need it for. I remember learning to "cook" in a microwave at school, we used it to cook bacon and sautee onions. It was kind of a gimmick and I don't think our cooking teacher was really sure what to do with it either, but I persuaded my mum to get one too (sorry mum) and now I think they are a waste of kitchen space and a completely pointless appliance if you also have a cooktop and an oven! This is apart from the fact that I'm totally convinced that they are safe to use. So rather than upgrade the old microwave to fit in with the nice new kitchen, we decided to put it in the shed and see if we can manage without it.
This is a
link to an article with photos showing the evolution of kitchens. I think the kitchen in this house was built in the 1950s (going from the style and the newspaper we found under the asbestos floor in the old pantry). By then electric stoves were available, but I don't think country areas had electricity supply until the 1960s, so the original kitchen in this house would have had a woodstove. Its kind of a combination of the 1950s kitchen, but with features from earlier kitchens.
See more here about how I keep the new kitchen clean quickly, with no chemicals...
So that is how the kitchen has turned out so far. What do you think?


The extra cupboard space is great for keeping ferments. I use the bottom of our pantry for aging vinegar, a benchtop for kombucha, and the top of the fridge for new vinegar ferments. I'd love to be able to tuck more away, in a cupboard of their own. You will be able to.
ReplyDeleteI love the new kitchen, although I'm such a softy for those old kitchens, I probably would have kept it myself. I've lived in a few of those houses, with the art deco styled, rounded corner shelves, at the end of a cabinet. I'd keep my ferments on them, lol. ;)
You've done a great job building into an old structure. They have some funny dimensions! You were sensible to put enough electric supply near the counter tops. I wish we had done that. You may find a couple of downlights will be helpful in your food prep areas. We have a lot of windows, but your island bench is is in the middle of the house. I wouldn't be able to see what we're doing on an overcast day, if it wasn't for our downlights.
Anyway, I hope you have many years of enjoyment in your new kitchen. As far as I'm concerned, a house is never really done, lol. It often changes as our needs change. :)
Congratulations also Liz. It must have been a great day when the kitchen went in. It is so much more difficult to work around existing elements in a space. You did well. I am glad you went with white I think you will find it easy to keep clean and so much brighter and always fresh looking.
ReplyDeleteDrawers are the only way to go if you have the opportunity . It is so easy to keep everything organized and easily found.
Dishwasher drawers are also fantastic.
I hope you enjoy your kitchen for many years.
Thank you for sharing.
Regards Janine
It looks great, it must be so good to have a new kitchen after all this time.
ReplyDeleteit's HUGE I love your new kitchen both colour choice and timber bench top, you'll be able to cook up a storm...............
ReplyDeleteVery smart, clean and bright - you're going to enjoy this kitchen for many decades
ReplyDeleteAnyway, I hope you have many years of enjoyment in your new kitchen,thank you!
ReplyDeletegoldenslot mobile
จีคลับ
gclub