
This is an article that I wrote for The Owner Builder magazine. If you're building a house (or thinking about it), this is a wonderful magazine for those interested in alternative building techniques and DIY options. I have just submitted part 2 of this story since we moved in, so I thought it was about time to share part 1 here. If you are building I'm sure they would love to publish your story too, just get in touch via the website.
In mid-2012 my husband, Peter, and I bought a 258 acre property in the small South Burnett settlement of Kumbia (near Kingaroy) in Queensland, with the intention of eventually building a house and setting up a small farm. Over a year later we were still trying to decide what type of house to build. Both of us were keen to use a sustainable building method, as we like natural materials and hate waste, but it wasn’t immediately obvious what would suit our property. Then we came across a removal house in our local area, advertised for only $10,000. It was located only 14 km from our property and was probably 100 years old (based on the when the area was originally settled).

More BEFORE photos of the house here.
The only problem was that it was a “Queenslander” style house. We had lived in a Queenslander before, and even though we loved the features, we knew it could be a lot of work to maintain and we were wary of the asbestos used in extensions. Even so, we made an appointment to view the house and were besotted with the sweet little cottage. We started referring to it as our “Second-hand” house. We were looking forward to the prospect of living in “VJs” (vertical joint walls) again instead of plasterboard and it was good to know that we wouldn’t be using much new material for our house.
When our offer was accepted we began the process of organising to move the house. Fortunately we found a really helpful building inspector who was able to guide us through the process. Removal houses are quite common in our area and we had several removalists to choose from. I got my owner-builder licence so that I could coordinate all the trades.
This is when we started to realise that it might be a slow process (spoiler alert: the house isn’t finished yet!). It took 6 months between buying the house and moving the house, and during that time we had to get a site geological survey, the house was inspected by a structural engineer and plans were drawn by a drafter. We had to get approval from council for the new septic system and the house removal. We had to organise a plumber to disconnect the plumbing at the original site and decomission the septic tank there.
Our first big challenge was finding an earth-moving contractor to help us level the pad for the house. We had selected a site on top of a hill, which was relatively flat, however we needed four large Ironbark gum trees removed. We waited for several months for various earthmoving contractors to be available to help us, and eventually we cut down the trees ourselves, leaving only the stumps to be removed. Just in time we were able to find a small excavator operator, who worked all weekend to remove the stumps and clear the house pad for us. Peter had to use our tractor to smooth it out as best he good. The largest stump was bigger than the excavator!

The site was also close enough to receive power from lines already running to our neighbour’s property. We had considered solar power, but as Peter is a metal fabricator, we decided that grid connection was more practical (remember this was in 2013, solar and battery systems have advanced considerably in the last few years and we may have made a different decision if we were starting the project in 2016). Fortunately we had already started organising the power connection before we bought the house, so it was ready around the same time as the house was moved.
The house had originally been orientated with the kitchen facing north and the “sunroom” (a built-in veranda) facing west. We wanted to take full advantage of solar orientation to keep the house cool in summer and warm in winter, so we faced the sunroom to the south, with the main veranda on the north. All of the windows are shaded in summer, with some sun in winter. Being on the top of the hill we also get a lovely breeze through the house, and the old design with plenty of windows and freezes over the doors for cross-ventilation means that the house stays cool without the need for air-conditioning.

When the removalist was finally ready to move he decided to split the house into two pieces. The house had originally had a wrap around veranda, with the kitchen extension added later, this made it relatively easy to separate into two pieces without major damage to the house. The first part was moved at 3am on day and second part was moved the same time the next day. We got up early and met the removalist at the starting point, following the house down the road. Most of the road was in good condition apart from the last 2 km down the dirt road from the highway to our gate, which had been badly washed out in a storm. Our careful removalist managed to bring both parts down the road and avoid both pot holes and gum tree branches with no damage to the house, an amazing feat!
While the house itself only cost us $10,000, the moving and restumping of the house came to nearly $40,000. Moving a house over a longer distance may not be economical, and some houses may not be suitable for removal if they cannot be split into suitable pieces. Many houses offered for removal are not in good condition and may require considerable work to repair once they arrive at their destination. Older houses with VJs seem to hold together better than newer plasterboard lined houses. The house we purchased also came with a small shed (already deconstructed), two concrete water tanks and a rotary clothesline! While we were initially excited to have these extra features, we later realised that it was difficult to move the tanks and shed, however it was a condition of our contract that we leave the site clear. In the end it worked out best that our removalist took the tanks away for us and cleaned up the property, and we collected the shed on the back of our car-trailer.
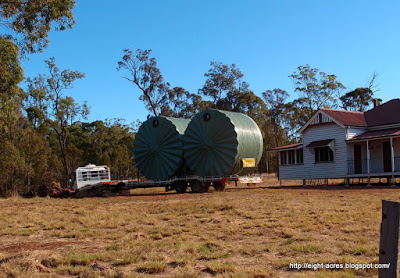
Once the two parts of the house were on the site it only took a couple of weeks for our removalist to restump the house on new RSH 50mm stumps, restore the old roof sheets (we were not required to replace the roof, however some councils may stipulate this) and cover up the join in the house. Then it was time for our plumbers to take over. We had bought two 2700 L rainwater tanks which the plumbers connected to the new downpipes. They hooked up all the old plumbing fittings to a new pump and set up a new septic system. The only issue we had was inadvertently buying tanks that were taller than our house guttering in its new position, so that the tanks had to be dug into the ground, and the suction line from the tank is now below the pump. This is only a problem when we have a power cut, because we can’t get water out of the tanks without the pump working. Having lived in rural areas with rainwater tanks for several years, we know that this is a problem best avoided if possible and we were kicking ourselves for not considering this before ordering the tanks.
Our only real building task was installing the stairs. Removalists typically do not install the old stairs, as even if they are not rotten, they are usually the wrong height as it just depends on the site and the height of the new stumps. Also, the stairs must be built to meet current building standards – with the correcting goings and risings and a suitable platform at the top, and old stairs may not comply. We went about designing our steps, while the engineer (me) was working out the angles using Pythagoras and a spreadsheet, the practical metal fabricator drew them out on a piece of board and started welding the stringers! Once we had it figured out it wasn’t too bad, but it did take a while to get it right. As we hadn’t got the house pad completely level, each set of stairs was bespoke. We sourced stair treads from a local timber shed (for the front stairs) and our removalist sold us an old set of stairs with suitable treads to reuse for the two sets of back stairs.

The house had three sets of inspections. Firstly we had paid a bond of $16,000 to the council for the removal process. They refunded that bond when we showed that the house had been stumped, roofed, had new stairs and was otherwise in sound condition in its new position. Then the plumbing inspector checked the plumber’s work. All of the new work was fine, but he had some concerns over the suitability of the old plumbing fittings, fortunately our plumber managed to convince the inspector to approve the work (considering it was our own rainwater, I couldn’t see how it was any of the council’s business anyway). We intended to refit the plumbing later, so I wasn’t keen on installing new fittings at that stage.
Finally we had the council inspection. To get to this stage we had to comply with the environmental requirements, including insulating in the ceiling space (we chose rockwool batts) and installing ceiling fans in all rooms including one of the verandas. Unfortunately this is a slightly backwards process – it would have been nice to install the fans and lights after the house was painted, but we wanted to get council approval as soon as possible, so now that we are painting inside we have to tape up all the nice light fittings!
Apart from the environmental requirements, the council inspection was mostly concerned with ensuring that the house could not blow away or burn down. This meant that we also had to remove the wood-fired combustion heater because we couldn’t prove to the inspector that it had been installed to the manufacturer’s instructions. We will definitely replace this with a new woodstove in future, as we like to use wood for heating and cooking in winter. Our property has a generous amount of trees and we can be self-sufficient for firewood. As part of the council requirements, we also had to strap all the bearers to the posts (the removalist had already strapped the rafters for us when he fitted the roof), to bring the house to current building standards. Peter also had to screw every VJ board in the walls to the bearers.
Just under a year after moving the house we received council approval, but that was really just the beginning of the process as we still needed to replace the roof (the council had accepted it, but it wasn’t in great condition), repaint inside and out, remove the asbestos sheeting, and rebuild the dated bathroom and kitchen.
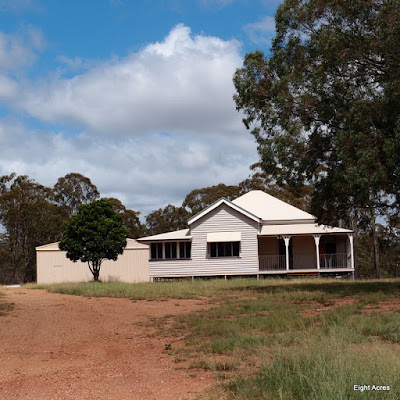
While working with an old Queenslander house is a challenge, it is also a whole lot of fun. I think of it as a cross between restoring an old piece of furniture and an archaeological dig! We are gradually uncovering more about the history of the house and the people who lived in it. Moving the house gave us the opportunity to replace the stumps and reorientate the house to better use solar heating and cross winds. We are both really happy to have found a sustainable option (recycling a secondhand house) that is both cheap and beautiful.
*****
In mid-2012 my husband, Peter, and I bought a 258 acre property in the small South Burnett settlement of Kumbia (near Kingaroy) in Queensland, with the intention of eventually building a house and setting up a small farm. Over a year later we were still trying to decide what type of house to build. Both of us were keen to use a sustainable building method, as we like natural materials and hate waste, but it wasn’t immediately obvious what would suit our property. Then we came across a removal house in our local area, advertised for only $10,000. It was located only 14 km from our property and was probably 100 years old (based on the when the area was originally settled).

More BEFORE photos of the house here.
The only problem was that it was a “Queenslander” style house. We had lived in a Queenslander before, and even though we loved the features, we knew it could be a lot of work to maintain and we were wary of the asbestos used in extensions. Even so, we made an appointment to view the house and were besotted with the sweet little cottage. We started referring to it as our “Second-hand” house. We were looking forward to the prospect of living in “VJs” (vertical joint walls) again instead of plasterboard and it was good to know that we wouldn’t be using much new material for our house.
When our offer was accepted we began the process of organising to move the house. Fortunately we found a really helpful building inspector who was able to guide us through the process. Removal houses are quite common in our area and we had several removalists to choose from. I got my owner-builder licence so that I could coordinate all the trades.
This is when we started to realise that it might be a slow process (spoiler alert: the house isn’t finished yet!). It took 6 months between buying the house and moving the house, and during that time we had to get a site geological survey, the house was inspected by a structural engineer and plans were drawn by a drafter. We had to get approval from council for the new septic system and the house removal. We had to organise a plumber to disconnect the plumbing at the original site and decomission the septic tank there.
Our first big challenge was finding an earth-moving contractor to help us level the pad for the house. We had selected a site on top of a hill, which was relatively flat, however we needed four large Ironbark gum trees removed. We waited for several months for various earthmoving contractors to be available to help us, and eventually we cut down the trees ourselves, leaving only the stumps to be removed. Just in time we were able to find a small excavator operator, who worked all weekend to remove the stumps and clear the house pad for us. Peter had to use our tractor to smooth it out as best he good. The largest stump was bigger than the excavator!

The site was also close enough to receive power from lines already running to our neighbour’s property. We had considered solar power, but as Peter is a metal fabricator, we decided that grid connection was more practical (remember this was in 2013, solar and battery systems have advanced considerably in the last few years and we may have made a different decision if we were starting the project in 2016). Fortunately we had already started organising the power connection before we bought the house, so it was ready around the same time as the house was moved.
The house had originally been orientated with the kitchen facing north and the “sunroom” (a built-in veranda) facing west. We wanted to take full advantage of solar orientation to keep the house cool in summer and warm in winter, so we faced the sunroom to the south, with the main veranda on the north. All of the windows are shaded in summer, with some sun in winter. Being on the top of the hill we also get a lovely breeze through the house, and the old design with plenty of windows and freezes over the doors for cross-ventilation means that the house stays cool without the need for air-conditioning.

When the removalist was finally ready to move he decided to split the house into two pieces. The house had originally had a wrap around veranda, with the kitchen extension added later, this made it relatively easy to separate into two pieces without major damage to the house. The first part was moved at 3am on day and second part was moved the same time the next day. We got up early and met the removalist at the starting point, following the house down the road. Most of the road was in good condition apart from the last 2 km down the dirt road from the highway to our gate, which had been badly washed out in a storm. Our careful removalist managed to bring both parts down the road and avoid both pot holes and gum tree branches with no damage to the house, an amazing feat!
While the house itself only cost us $10,000, the moving and restumping of the house came to nearly $40,000. Moving a house over a longer distance may not be economical, and some houses may not be suitable for removal if they cannot be split into suitable pieces. Many houses offered for removal are not in good condition and may require considerable work to repair once they arrive at their destination. Older houses with VJs seem to hold together better than newer plasterboard lined houses. The house we purchased also came with a small shed (already deconstructed), two concrete water tanks and a rotary clothesline! While we were initially excited to have these extra features, we later realised that it was difficult to move the tanks and shed, however it was a condition of our contract that we leave the site clear. In the end it worked out best that our removalist took the tanks away for us and cleaned up the property, and we collected the shed on the back of our car-trailer.

Once the two parts of the house were on the site it only took a couple of weeks for our removalist to restump the house on new RSH 50mm stumps, restore the old roof sheets (we were not required to replace the roof, however some councils may stipulate this) and cover up the join in the house. Then it was time for our plumbers to take over. We had bought two 2700 L rainwater tanks which the plumbers connected to the new downpipes. They hooked up all the old plumbing fittings to a new pump and set up a new septic system. The only issue we had was inadvertently buying tanks that were taller than our house guttering in its new position, so that the tanks had to be dug into the ground, and the suction line from the tank is now below the pump. This is only a problem when we have a power cut, because we can’t get water out of the tanks without the pump working. Having lived in rural areas with rainwater tanks for several years, we know that this is a problem best avoided if possible and we were kicking ourselves for not considering this before ordering the tanks.
Our only real building task was installing the stairs. Removalists typically do not install the old stairs, as even if they are not rotten, they are usually the wrong height as it just depends on the site and the height of the new stumps. Also, the stairs must be built to meet current building standards – with the correcting goings and risings and a suitable platform at the top, and old stairs may not comply. We went about designing our steps, while the engineer (me) was working out the angles using Pythagoras and a spreadsheet, the practical metal fabricator drew them out on a piece of board and started welding the stringers! Once we had it figured out it wasn’t too bad, but it did take a while to get it right. As we hadn’t got the house pad completely level, each set of stairs was bespoke. We sourced stair treads from a local timber shed (for the front stairs) and our removalist sold us an old set of stairs with suitable treads to reuse for the two sets of back stairs.

The house had three sets of inspections. Firstly we had paid a bond of $16,000 to the council for the removal process. They refunded that bond when we showed that the house had been stumped, roofed, had new stairs and was otherwise in sound condition in its new position. Then the plumbing inspector checked the plumber’s work. All of the new work was fine, but he had some concerns over the suitability of the old plumbing fittings, fortunately our plumber managed to convince the inspector to approve the work (considering it was our own rainwater, I couldn’t see how it was any of the council’s business anyway). We intended to refit the plumbing later, so I wasn’t keen on installing new fittings at that stage.
Finally we had the council inspection. To get to this stage we had to comply with the environmental requirements, including insulating in the ceiling space (we chose rockwool batts) and installing ceiling fans in all rooms including one of the verandas. Unfortunately this is a slightly backwards process – it would have been nice to install the fans and lights after the house was painted, but we wanted to get council approval as soon as possible, so now that we are painting inside we have to tape up all the nice light fittings!
Apart from the environmental requirements, the council inspection was mostly concerned with ensuring that the house could not blow away or burn down. This meant that we also had to remove the wood-fired combustion heater because we couldn’t prove to the inspector that it had been installed to the manufacturer’s instructions. We will definitely replace this with a new woodstove in future, as we like to use wood for heating and cooking in winter. Our property has a generous amount of trees and we can be self-sufficient for firewood. As part of the council requirements, we also had to strap all the bearers to the posts (the removalist had already strapped the rafters for us when he fitted the roof), to bring the house to current building standards. Peter also had to screw every VJ board in the walls to the bearers.

Just under a year after moving the house we received council approval, but that was really just the beginning of the process as we still needed to replace the roof (the council had accepted it, but it wasn’t in great condition), repaint inside and out, remove the asbestos sheeting, and rebuild the dated bathroom and kitchen.
While working with an old Queenslander house is a challenge, it is also a whole lot of fun. I think of it as a cross between restoring an old piece of furniture and an archaeological dig! We are gradually uncovering more about the history of the house and the people who lived in it. Moving the house gave us the opportunity to replace the stumps and reorientate the house to better use solar heating and cross winds. We are both really happy to have found a sustainable option (recycling a secondhand house) that is both cheap and beautiful.
****
We moved into the house in April 2017. You can catch up on the house progress since this article was written. Part 2 will be in the next The Owner Builder magazine.
We moved into the house in April 2017. You can catch up on the house progress since this article was written. Part 2 will be in the next The Owner Builder magazine.
A fascinating account thus far. Certainly way more expensive than I had imagined though.
ReplyDeleteSuch an interesting read Liz. I love reading about what you're up to. We'd love to do this one day!
ReplyDelete